안녕하세요! 오늘도 온 집안을 달콤하고 고소한 향기로 가득 채워줄 행복한 베이킹 레시피로 찾아왔습니다. 오후 나른한 시간에 따뜻한 우유 한 잔, 혹은 쌉싸름한 아메리카노 한 잔에 곁들이면 세상 부러울 것이 없는 최고의 디저트가 있죠. 바로 남녀노소 누구나 좋아하는 보들보들한 '카스테라(Castella)'입니다.
카스테라는 들어가는 재료가 생각보다 아주 단순하지만, 막상 집에서 만들면 떡처럼 단단해지거나 반대로 너무 푸석해져서 실패하기 쉬운 까다로운 품목이기도 합니다. 하지만 걱정하지 마세요! 오늘은 베이킹 초보자분들도 전문점 부럽지 않은 촘촘하고 촉촉한 식감을 낼 수 있도록, 거품 올리는 타이밍부터 기포를 정리하는 세심한 방법까지 아주 상세하게 풀어내 보려고 합니다. 은은한 꿀 향이 입안 가득 퍼지는 정통 카스테라의 세계로 함께 빠져볼까요?
Hello, baking enthusiasts! Today, I am incredibly excited to share a foolproof recipe for one of the most beloved, comforting, and melt-in-your-mouth treats: Honey Castella. Castella is a classic sponge cake known for its uniquely moist, dense yet fluffy texture, and a beautifully browned top. While it requires only a few basic pantry ingredients, achieving that perfectly soft, fine-textured crumb can be a bit tricky for beginners. Don't worry, though! Today, I will guide you through all the essential techniques—from whipping the perfect egg foam to eliminating large air pockets—so you can successfully bake an artisanal-quality Castella right in your home oven. Let's get baking!
카스테라 속에 담긴 흥미로운 역사 (The Fascinating History of Castella)
우리가 흔히 일본 나가사키의 특산물로 알고 있는 카스테라는 사실 그 뿌리가 유럽에 있습니다. 16세기 무렵, 포르투갈 상인과 선교사들이 일본 나가사키 항구에 들어오면서 전해진 서양의 과자가 그 시초인데요. 당시 포르투갈인들이 이 빵을 '카스티야 왕국의 빵(Pão de Castela)'이라고 소개한 것에서 지금의 '카스테라'라는 이름이 유래되었다고 전해집니다.
당시 일본인들은 이 부드럽고 달콤한 서양식 빵에 완전히 매료되었고, 오랜 세월을 거치며 자신들의 입맛과 식문화에 맞게 레시피를 발전시켰습니다. 그 결과 유제품(버터나 우유)을 거의 사용하지 않고 달걀과 설탕, 꿀, 그리고 밀가루의 배합만으로 특유의 쫄깃하면서도 촉촉한 식감을 내는 지금의 '나가사키 카스테라'가 탄생하게 되었습니다. 서양에서 건너와 동양의 장인 정신과 만나 완성된 카스테라는, 이제 전 세계 디저트 매니아들에게 '가장 완벽한 스펀지케이크'라는 찬사를 받으며 글로벌한 사랑을 받고 있습니다.
Although Castella is widely famous as a regional specialty of Nagasaki, Japan, its true origins trace back to Europe. In the 16th century, Portuguese merchants and missionaries arrived in the port of Nagasaki and introduced a traditional sponge cake. It is said that the name "Castella" derived from Pão de Castela, meaning "bread from Castile" (a historical kingdom in Spain). The Japanese were completely captivated by this sweet, airy bread and spent centuries refining the recipe to suit their palate. Unlike Western sponge cakes, traditional Castella uses no butter or oil; instead, it relies strictly on the perfect emulsion of eggs, sugar, and honey to create its signature dense, moist, and chewy texture. It is a beautiful example of Western culinary roots evolving into an Eastern baking masterpiece.
성공적인 베이킹을 위한 준비 재료 (Ingredients for the Perfect Castella)
카스테라는 재료의 정밀한 계량이 성공의 80%를 좌우합니다. 베이킹을 시작하기 전, 저울을 사용해 정확하게 무게를 달아 준비해 주세요. (가로 20cm x 세로 10cm 카스테라 틀 1개 기준입니다.)
Accurate measurement is the absolute key to baking a successful Castella. Please use a digital kitchen scale to weigh these ingredients precisely before you begin.
기본 재료 (Main Ingredients)
- 달걀 (Large Eggs): 4개 (반드시 냉장고에서 미리 꺼내어 차갑지 않은 상온 상태로 준비합니다.)
- 강력분 (Bread Flour): 100g (박력분 대신 강력분을 사용해야 카스테라 특유의 묵직하고 쫄깃한 식감이 살아납니다.)
- 설탕 (Granulated Sugar): 90g (설탕은 거품의 안정성을 유지해 주는 역할을 하므로 줄이지 않는 것을 권장합니다.)
- 꿀 (Honey): 25g (은은한 풍미와 촉촉함을 더해주는 핵심 재료입니다.)
- 미림 또는 맛술 (Mirin / Cooking Wine): 1큰술 (1 tbsp — 달걀의 비린내를 완벽하게 잡아줍니다.)
- 우유 (Warm Milk): 20ml (꿀과 함께 섞어서 따뜻한 상태로 준비합니다.)
실패 없이 촉촉하게 만드는 조리 가이드 (Step-by-Step Baking Guide)
카스테라는 버터 같은 유지류가 들어가지 않기 때문에, 오직 달걀 거품의 힘으로만 빵을 부풀려야 합니다. 아래의 과정을 차근차근 따라오시면 부드러운 속살을 만나실 수 있습니다.
Because traditional Castella contains no baking powder or butter, it relies entirely on the mechanical aeration of the eggs to rise. Follow this smooth narrative to guide your hands.
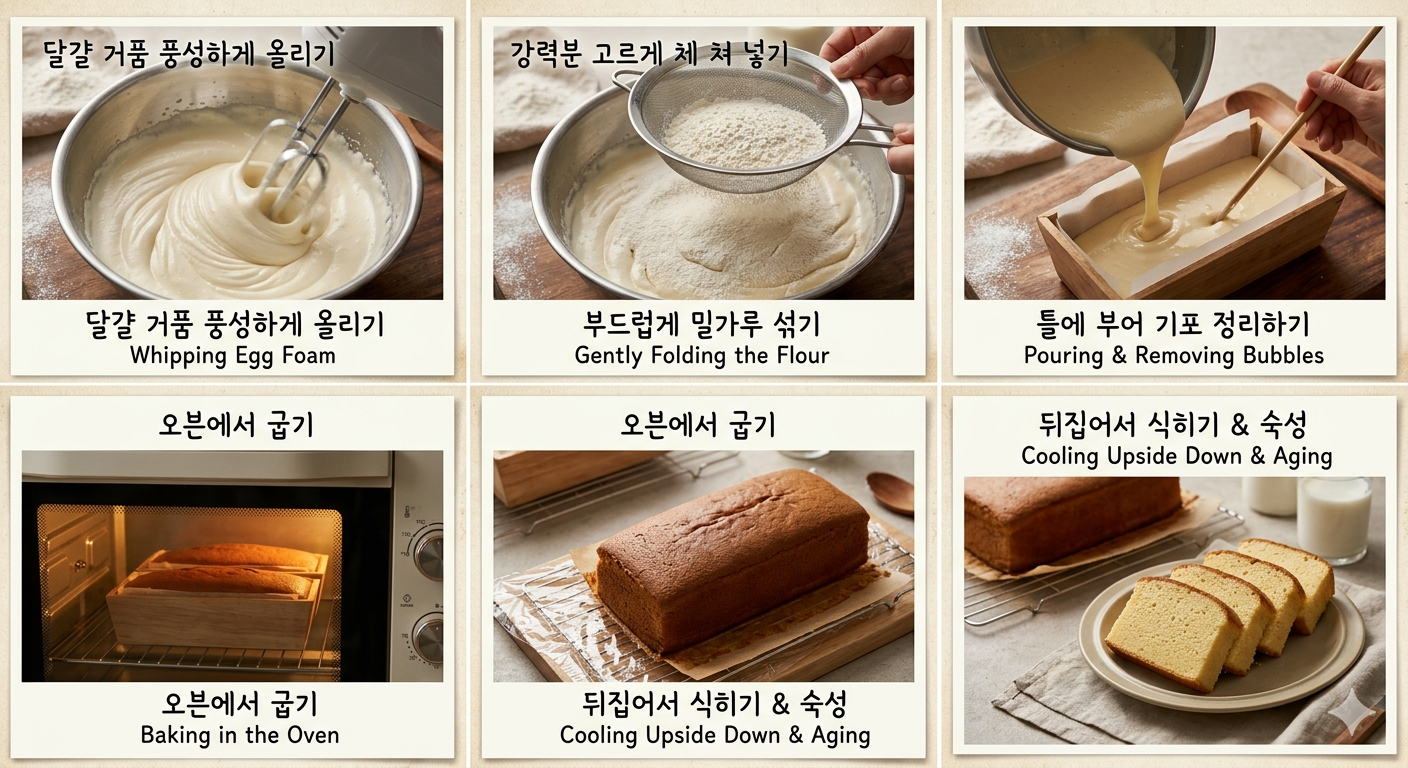
달걀 거품 풍성하게 올리기 (Whipping the Egg Foam to Perfection)
완벽한 카스테라의 첫걸음은 달걀 거품을 안정적이고 풍성하게 올리는 것에서 시작됩니다. 커다란 볼에 상온의 달걀 4개를 깨 넣고 가볍게 풀어준 뒤, 설탕과 분량의 꿀을 모두 넣어줍니다. 이때 달걀물이 담긴 볼 바닥에 따뜻한 물을 받쳐 온도를 살짝 올려주는 '중탕 방식'을 사용하면 설탕이 서서히 녹으면서 거품이 훨씬 조밀하고 단단하게 올라옵니다. 핸드믹서를 고속으로 올려 단단하게 휘핑해 주다 보면, 노랗던 달걀물이 어느새 아이보리색 크림처럼 변하게 됩니다. 거품기를 들어 올렸을 때 반죽이 아래로 떨어지며 선명한 리본 자국을 남기고, 그 자국이 약 3초 이상 그대로 유지될 때까지 충분히 거품을 올려주어야 합니다.
Start by cracking four room-temperature eggs into a large mixing bowl. Add the granulated sugar and honey. Place the bowl over a pot of warm water (a double boiler method) to gently warm the egg mixture, which helps the sugar dissolve completely and stabilizes the foam. Using a hand mixer on high speed, whip the mixture until it transforms from a dark yellow to a thick, pale ivory cream. You will know it's ready when you lift the beaters and the batter drops down forming a distinct "ribbon" pattern that stays visible on the surface for at least three seconds.
조밀한 반죽 완성하기와 밀가루 섞기 (Sifting the Flour and Folding)
달걀 거품이 완벽하게 올라왔다면, 핸드믹서의 속도를 가장 낮은 1단으로 줄여 약 1~2분간 가만히 한 방향으로 돌려줍니다. 이 과정을 '기포 정리'라고 부르는데, 반죽 속에 숨어있는 큰 공기 방울들을 제거하여 카스테라의 단면을 촘촘하게 만들어주는 아주 중요한 작업입니다. 기포 정리가 끝나면 준비한 강력분을 고운 체에 두 번 쳐서 반죽에 넣어줍니다. 이때 주걱을 이용해 아래에서 위로 퍼 올리듯, 그리고 반죽을 가르듯 아주 부드럽고 빠르게 섞어주어야 공들여 올린 달걀 거품이 꺼지지 않습니다. 밀가루가 서서히 섞여갈 때쯤, 따뜻한 우유와 미림을 섞어둔 액체를 주걱을 타고 흘려보내며 반죽 전체가 매끄러운 크림 상태가 될 때까지 골고루 마무리 섞기를 해줍니다.
Once the ribbon stage is achieved, turn your mixer to the lowest speed and stir gently for 1-2 minutes without moving the bowl too much. This crucial process eliminates large air bubbles, ensuring a uniform and dense crumb. Next, sift the bread flour twice directly into the batter. Using a rubber spatula, gently fold the flour from the bottom up in a sweeping motion. Be careful not to deflate the delicate egg foam. Just before the flour is fully incorporated, drizzle in the warm milk and mirin mixture over the spatula. Fold carefully until the batter becomes completely smooth, glossy, and homogeneous.
틀에 붓기 및 오븐에서 구워내기 (Pouring into the Mold and Baking)
이제 준비된 카스테라 틀에 유황 종이나 테프론 시트를 깔고 반죽을 높은 곳에서 아래로 툭 떨어뜨리듯 부어줍니다. 높은 곳에서 부으면 반죽이 채워지면서 마지막 큰 기포들이 자연스럽게 정리됩니다. 반죽을 다 채운 후에는 젓가락을 이용해 반죽 속을 지그재그로 몇 번 저어주어 미세한 기포까지 마저 정리해 줍니다. 170도로 미리 예쁜 열을 올려둔 오븐에 반죽을 넣고 우선 10분간 구워 윗면에 먹음직스러운 갈색 빛깔을 내줍니다. 그 후 오븐 온도를 150도로 낮추어 속까지 은은하게 익도록 약 35분에서 40분간 더 구워냅니다. 꼬치로 가운데를 찔러보아 반죽이 묻어나지 않으면 완벽하게 잘 익은 것입니다.
Pour the batter from a relatively high distance into a loaf pan lined with parchment paper; this naturally pops any remaining large air pockets. Once poured, take a chopstick and draw a zigzag pattern through the batter to distribute it evenly and release tiny hidden bubbles. Place the pan into an oven preheated to 170°C (340°F) and bake for 10 minutes to develop that iconic, beautiful golden-brown top. Then, lower the temperature to 150°C (300°F) and bake for an additional 35-40 minutes to gently cook the inside. Insert a toothpick into the center—if it comes out completely clean, your Castella is perfectly baked!
카스테라의 촉촉함을 200% 살리는 보관 및 숙성 비법 (The Secret to Ultimate Moisture: Aging)
- 꺼내자마자 뒤집어서 식히기: 오직 달걀의 힘으로 부푼 카스테라는 오븐에서 나오자마자 뜨거운 김이 빠지면서 위가 푹 꺼질 수 있습니다. 오븐에서 꺼내자마자 유기농 오일이나 참기름을 살짝 바른 랩이나 유니랩 위에 카스테라의 윗면이 바닥으로 가도록 거꾸로 뒤집어서 식혀주세요. 이렇게 하면 수분이 날아가는 것을 막고 평평하고 예쁜 모양을 유지할 수 있습니다.
- 하루 동안의 기다림, 숙성이 핵심입니다: 카스테라는 구워진 직후 바로 먹으면 다소 폭신하기만 하고 특유의 촉촉함을 느끼기 어렵습니다. 한 김 식은 카스테라를 랩으로 꼼꼼하게 밀봉하여 냉장고나 서늘한 곳에 최소 하루(24시간) 정도 숙성시킨 뒤 드셔보세요. 빵 내부에 수분과 꿀의 풍미가 전체적으로 골고루 퍼지면서, 입안에 넣자마자 사르르 녹아내리는 극강의 촉촉하고 쫀득한 식감을 경험하실 수 있습니다.
- Cool It Upside Down Immediately: Since Castella relies solely on egg structure, it can shrink as it cools. To prevent this, flip the cake upside down onto a sheet of plastic wrap brushed with a tiny bit of neutral oil as soon as it comes out of the oven. This traps the hot moisture inside and keeps the top surface perfectly flat and smooth.
- The 24-Hour Aging Magic: Eating Castella straight out of the oven might feel a bit dry or like a regular sponge cake. The real magic happens with time. Wrap the completely cooled cake tightly in plastic wrap and let it age in the refrigerator or a cool place for at least 24 hours. This allows the moisture and honey flavors to redistribute evenly throughout the crumb, transforming it into an incredibly soft, rich, and decadent dessert that practically melts on your tongue.
오늘 소개해 드린 홈메이드 카스테라 레시피는 정성과 기다림이 만들어내는 최고의 달콤함입니다. 과정 하나하나에 세심한 손길이 필요하지만, 하루 동안 꾹 참고 기다린 뒤 마주하는 첫 한 입의 감동은 베이킹의 아기자기한 즐거움을 온전히 느끼게 해줍니다. 이번 주말에는 사랑하는 가족들을 위해 고소한 달걀 향과 향긋한 꿀 풍미가 가득한 수제 카스테라를 직접 구워 행복한 티타임을 선물해 보시는 건 어떨까요? 베이킹 과정 중 궁금한 점이 있으시다면 언제든 댓글로 남겨주세요. 달콤하고 행복한 하루 보내세요!
Baking a traditional Honey Castella is a beautiful exercise in patience and precision. While it requires careful attention during the whipping and folding stages, the reward after a day of patient aging is absolutely incomparable. This weekend, fill your home with the nostalgic aroma of sweet honey and warm eggs, and treat your loved ones to a luxurious, melt-in-your-mouth tea time. If you have any questions or encounter any trouble during the process, feel free to leave a comment below. Happy baking and enjoy your sweet day!